Jump for Cases Beginner Guide: Core Loop, Jumping & First Steps
Learn the core progression loop in Jump for Cases by Lucky Animals!, including Jump Zone prompts, rolling cases, placing animals, and surviving the Tsunami.
Understanding the Official Core Loop
Jump for Cases (Place ID 93545804988403, created by Lucky Animals!) revolves around an interconnected progression cycle stated in the official game description: train your legs, jump farther to roll cases, discover rare animals and mutations, place those animals on your plot to earn money, and eventually rebirth or upgrade your base. Before focusing on high-tier cases or base expansions, new players need to establish a steady flow of cash and leg power.
Note on identity: Do not confuse this experience with older, similarly named Roblox games such as August Jump for Cases, RNG variants, or Roll Cases for Brainrots. All guidance here applies strictly to the Lucky Animals! release reviewed in November 2026.
- Prerequisite: Enter the starting area and locate both your personal base plot and the Jump Zone.
- Step 1: Train your legs and use the Jump Zone to launch across the track and collect cases.
- Step 2: Open collected cases to reveal animals of varying rarities.
- Step 3: Place revealed animals onto your base pedestals so they begin generating cash per second.
- Step 4: Collect your earnings, upgrade your animals or training weights, and prepare to survive the Tsunami event.
Using the Jump Zone and World Tabs
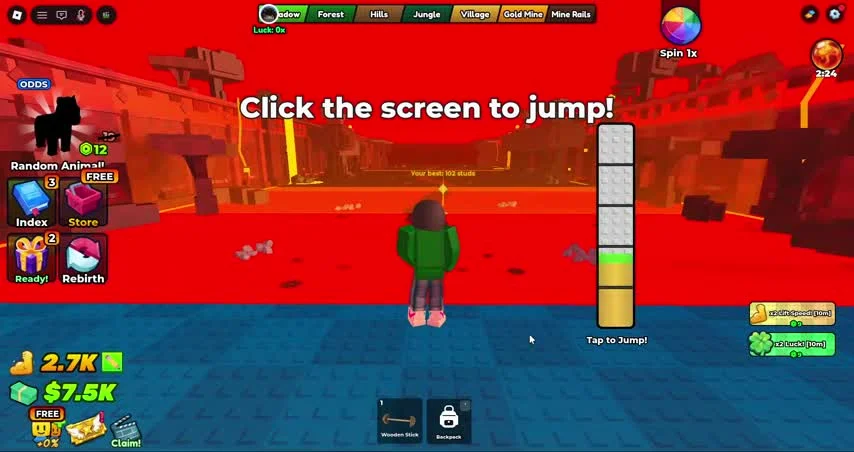
Your primary active task for acquiring cases happens inside the Jump Zone. According to screen-visible observations recorded in November 2026, stepping into the Jump Zone triggers on-screen prompts reading 'Click the screen to jump' alongside a 'Tap to Jump' button and a vertical indicator bar. While the vertical bar visually accompanies the launch prompt, no exact optimal timing window or mechanical multiplier on that bar is proven by the inspected frames.
At the top of the screen during a jump run, a progression bar displays distinct world or zone tabs in sequence: Meadow, Forest, Hills, Jungle, Village, Gold Mine, and Mine Rails. Jumping farther allows your character to reach deeper zones along this track, directly supporting the official goal to jump farther and roll cases.
Tsunami Survival and Fixing Stalled Progress
The official game description highlights two environmental and social features alongside basic collection: 'Trigger the Tsunami and survive!' and 'Compete with other players', as well as support for Plus Rewards. Because exact Tsunami wave speeds, trigger cooldowns, and penalty formulas are not confirmed in the inspected frames, players should treat Tsunami announcements with caution and prioritize banking or securing progress on their plot whenever possible.
If your early progression feels stalled because you cannot reach past the Meadow or Forest tabs, the recovery process is straightforward. Stop attempting unassisted long jumps and return to your base plot. Ensure every available pedestal with an animal is actively generating cash, collect your pooled money, and invest in either animal level upgrades or heavier barbells in the Weights Shop. Increasing your leg training power is the officially stated method to jump farther and unlock new progression.
Quick Reference: Verified Early-Game Systems
Use the summary table below to distinguish between official feature descriptions and specific visual elements recorded during our November 2026 frame inspection.
| System | Verified Evidence Source | Known Function or Detail | Unverified / Uncertain Aspect |
|---|---|---|---|
| Jump Zone Prompts | Screen-visible frame (Nov 2026) | Shows 'Click the screen to jump', 'Tap to Jump', and a vertical bar | Exact mechanical impact of the vertical bar position |
| World Track Tabs | Screen-visible frame (Nov 2026) | Lists Meadow, Forest, Hills, Jungle, Village, Gold Mine, Mine Rails | Exact distance thresholds required for each tab |
| Tsunami Mechanic | Official Description | Players can trigger the Tsunami and must survive | Wave trigger cost, cooldown, and failure penalties |
| Plus Rewards | Official Description | Explicitly listed as supported in the game description | Exact numerical reward breakdown |